Load Web Security Values
Description
Populate the controls with data from the web security system.
Discussion
The Load Web Security Values action script populates a UX component with security info for a user. This action can be used to create an interface for updating a user's security settings in the web security system.
Properties
The action is configured using the following properties:
Find User By
The security value used to look up the user. The preferred method is User Name.
Find by Value Source
The Xbasic variable that contains the value to use as the Find User By value. The variable must be defined prior to calling the action.
- Source
- Description
- local variable
The value to use is defined in a local Xbasic variable defined in the function or event calling the Action Script. For example, dim userName as C = "[email protected]". userName would be the value entered in Find by Value Source.
This option is often used in tandem with the Populate a Dialog with data from one or more table(s) action. The Populate a Dialog with data from one or more table(s) action is used to generate the Xbasic variable for use with the Load Web Security Values action. See example below for more info.
- session variable
The value to use is a session variable. For example, session.userName. userName would be the value entered in Find by Value Source.
- request variable
The value to use is a request variable. For example, e.rv.userName. userName would be the value entered in Find by Value Source.
- rtc variable
The value to use is a runtime calculation variable. For example, e.rtc.userName. userName would be the value entered in Find by Value Source.
- argument
The value to use is an argument defined in the component's arguments properties. For example, if you have defined an argument called "userName" set at runtime, userName would be the value entered in Find by Value Source.
User Name
The control in the component that contains the User Name or User Id. Repeating section controls are not supported.
Password
The control in the component that contains the user's password. Repeating section controls are not supported.
Confirm Password
The control in the component used to verify the user's password. The value is compared against the password entered in the Password control. Repeating section controls are not supported.
Security Groups
The control in the component that contains the user's security groups. Repeating section controls are not supported.
User Identifier (guid)
The control in the component that contains the user's security identifier. This control is usually hidden. Repeating section controls are not supported.
Example: Using the Load Web Security Values Action
After you register a user into a web security system it is useful to be able to find and edit a record. This guide demonstrates how to use the load web security action. The process is also explained in this video, which is the third video in a series.
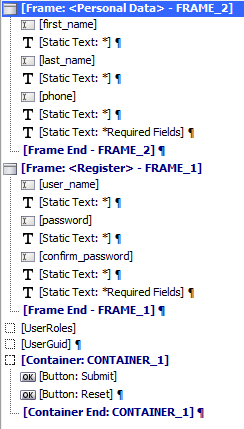
Build a Component with a Register and Personal Data Section
Build the Component described in the Validate Web Security guide and the Save Submitted Data to Table(s).
Add New Security Groups to the Web Security Folder
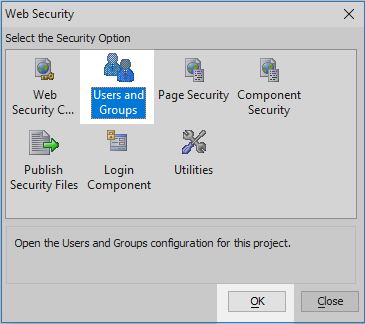
From the Web Projects Control Panel click on the 'Web Security' button.

In the Web Security dialog click on the 'Users and Groups' option and click OK.
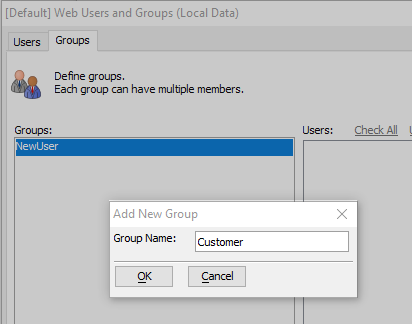
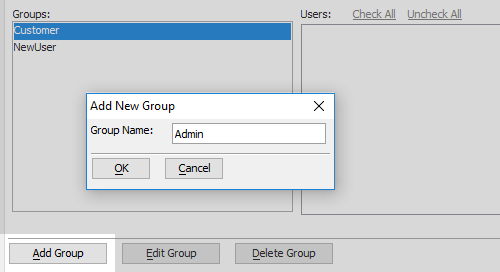
Open the 'Groups' tab and click the 'Add Group' button.
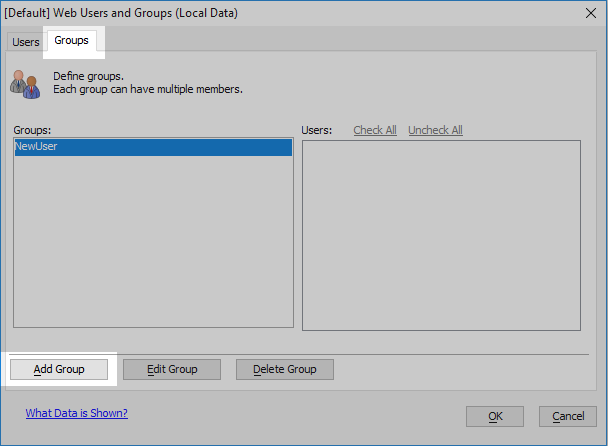
Name the new group 'Customer'.
Click the 'Add Group' button again and name the group 'Admin'. Click 'OK' and 'Close'.
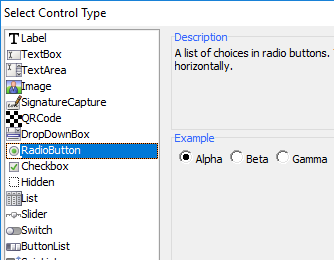
Set the UserRoles Control to be a Radio Button
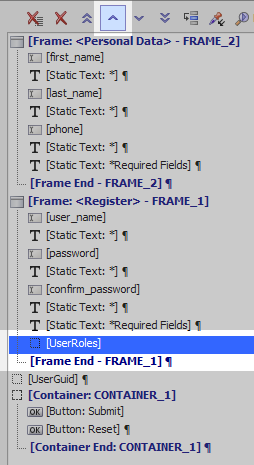
Open the UX Component containing the Register and Personal Data Section. Highlight the [UserRoles] Hidden control.
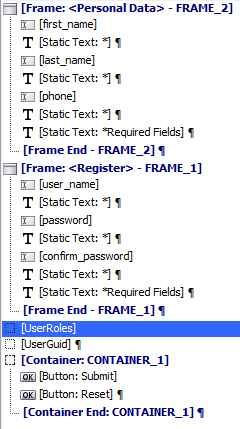
Click the blue 'up' arrow in the Controls page toolbar to move the hidden control inside the 'Register' frame container.
With the [UserRoles] control highlighted view the properties list on the right. Click the
 button next to the 'Control type' property.
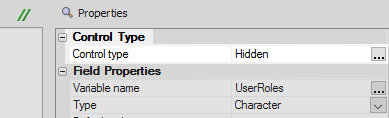
Select the 'RadioButton' control type.
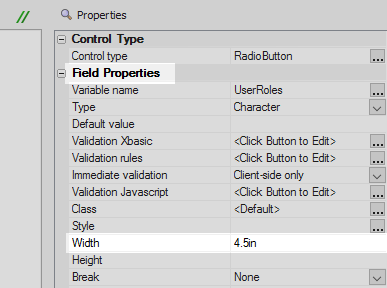
Scroll down to the 'Field Properties' section and set the 'Width' property to be '4.5in'.
Scroll down to the 'RadioButton Properties' section. Click the
button next to the 'Choices' property.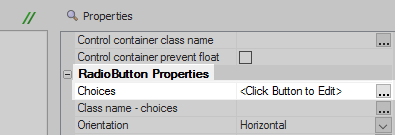
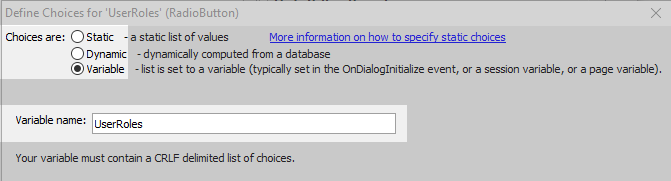
Select the 'Variable' radio button option in the dialog that opens. Set the 'Variable name' to be 'UserRoles'.
Add a Load Web Security Values Action to the onDialogInitialize Event
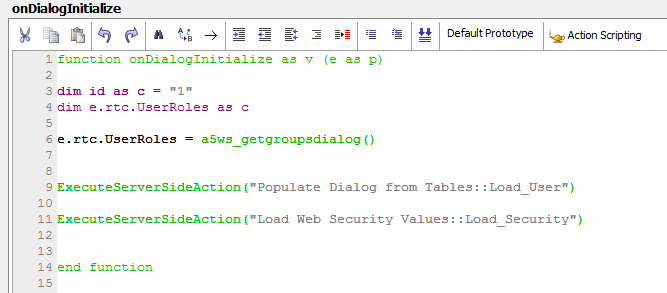
Once a record in the registered users table is found, the username in the record will be used to find the related security record. In the onDialogInitialize event a variable must be passed to the dialog to find the user in the registered users table. In this example this is a variable named id. A e.rtc variable is set up to populate the radio control for the UserRoles or user groups. The a5ws_GetGroupsDialog() is used to populate the variable. This function is specifically designed to be used in the dialog events.
An action script will be used to populate the data from the registered users table. This action uses the variable named 'id' as its primary key source. In the "Populate Dialog with Data from One or More Table(s)" action's properties sheet the 'Capture raw data' property is also checked. In this example the username and registered user data are used to capture to related security record. We need to capture that value in a variable after the record is found. This data will be returned with a variable name "_data" plus the field name, which will be the username. Finally we will add an action to load the security data. With the Load Web Security Values action The preferred value to use is username. You can find the source for the value using a number of options, here we will use the 'local variable' option.
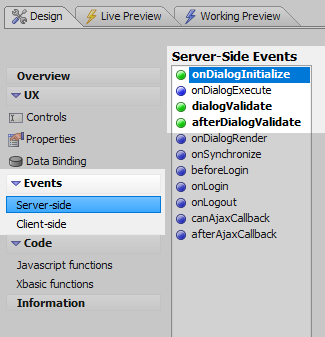
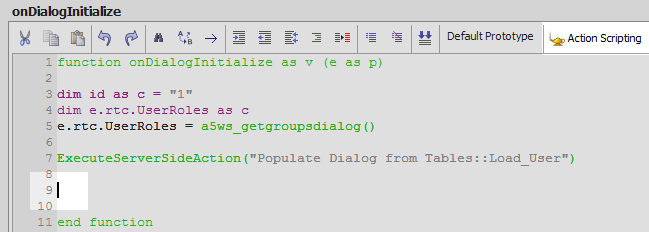
Expand the 'Events' menu and open the 'Server-side' events page. In the 'Server-Side Events' list highlight the 'onDialogInitialize' event.
Add the following lines of code to the event definition.
dim id as c = "1"
dim e.rtc.UserRoles as c
e.rtc.UserRoles = a5ws_getgroupsdialog()
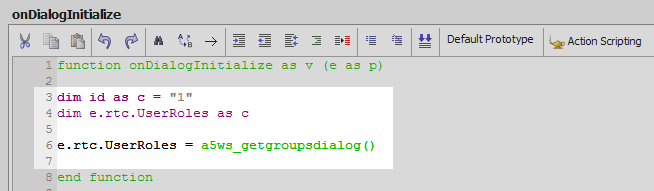 Here we are adding the 'id' variable and then e.rtc variable uses this to populate the radio control buttons with the 'UserRoles', or groups, option.
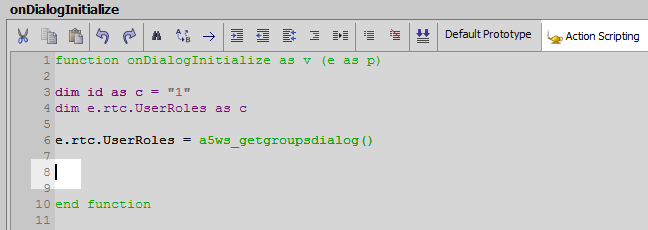
Place the mouse cursor just below the newly entered line of code and click the 'Action Scripting' button.
Highlight the "Populate a Dialog with data from one or more tables" action and click OK.

Name the action 'Load_User' and click OK.
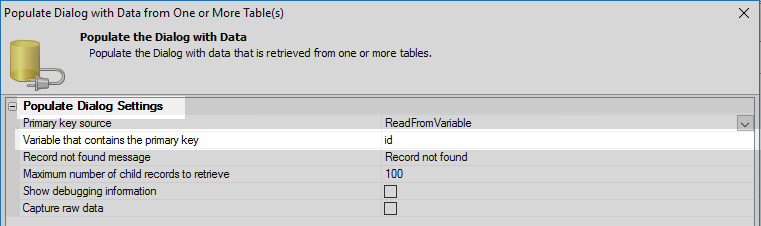
In the action's settings genie, set the 'Primary key source' dropdown to be 'ReadFromVariable'.
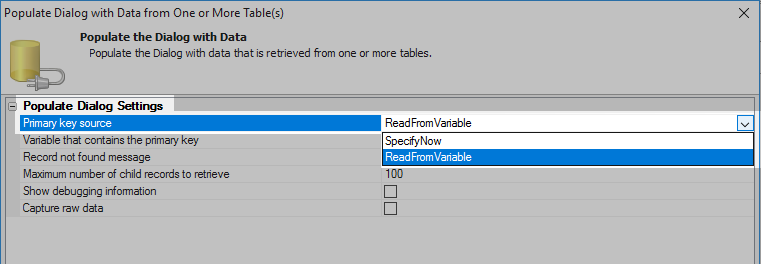
Set the 'Variable that contains the primary key' property to be the variable 'id'.
Check the 'Capture raw data' checkbox.
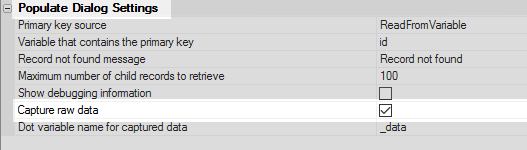
Next to the 'Dot variable name for captured data' property type '_data'. Click OK to close the settings genie.
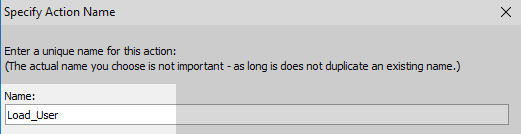
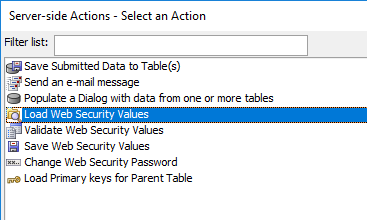
Place the mouse cursor under the "Populate Dialog from Tables" action and click on the "Action Scripting" button a second time.
From the list of actions, highlight the 'Load Web Security Values' action and click OK.
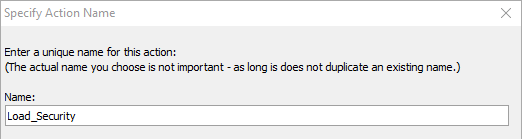
Give the new action the name 'Load_Security'. Click OK.
In the 'Load Web Security Values' action's settings genie click the dropdown next to the 'Find User By' setting. Select the 'User Name' option.
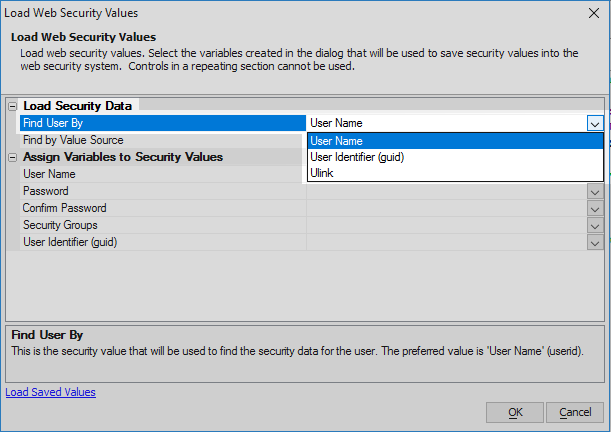
Click the
button next to the 'Find by Value Source' setting.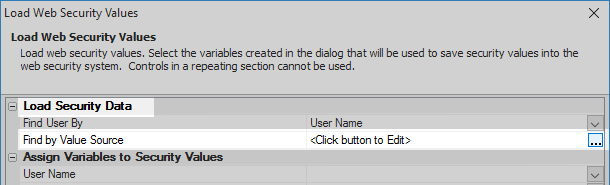
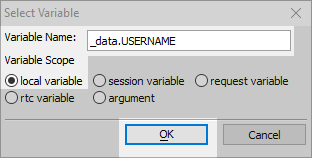
Select the 'local variable' radio button option. Give the local variable the variable name '_data.USERNAME'. Click OK.
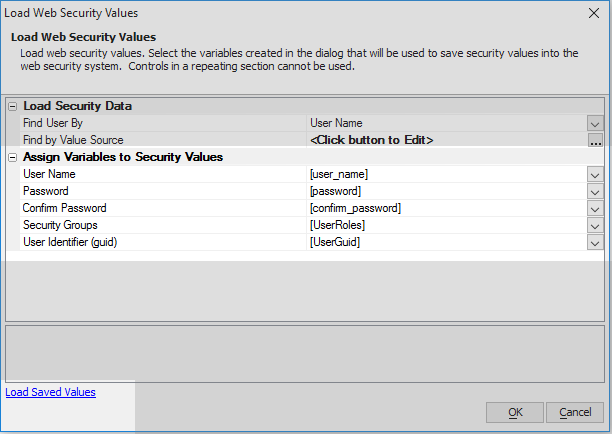
Click the 'Load Saved Values' hyperlink at the bottom left-hand corner of the settings genie. This will automatically fill in the 'Assign Variables to Security Variables' section; assuming that the component in the . Click OK.
Resulting event definition.
Run the Component in Working Preview
Run the component in working preview. Fill in the Personal Data and Register sections of the component.
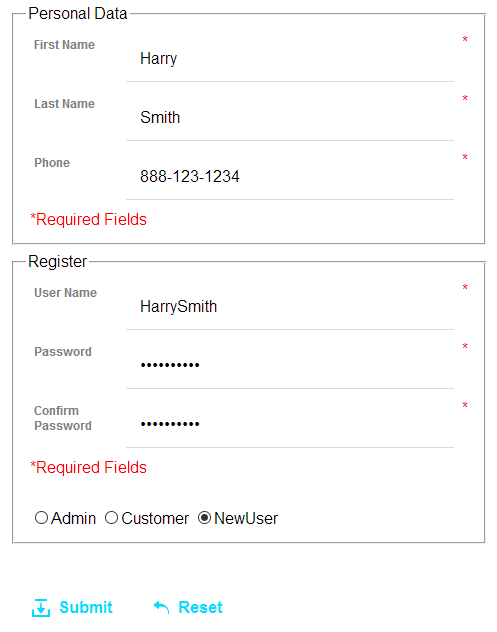
Click the 'Submit' button.
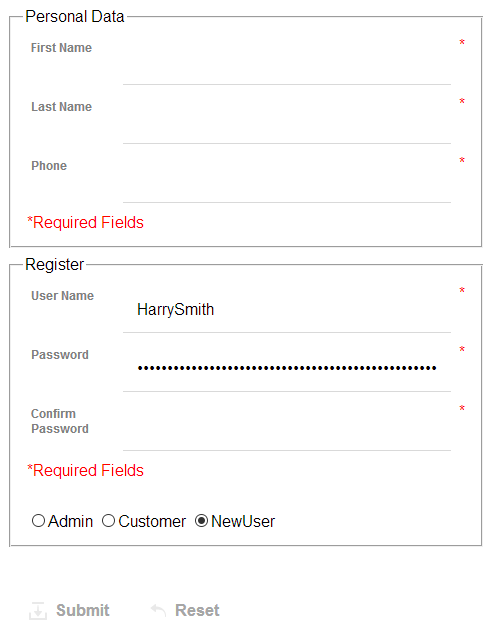
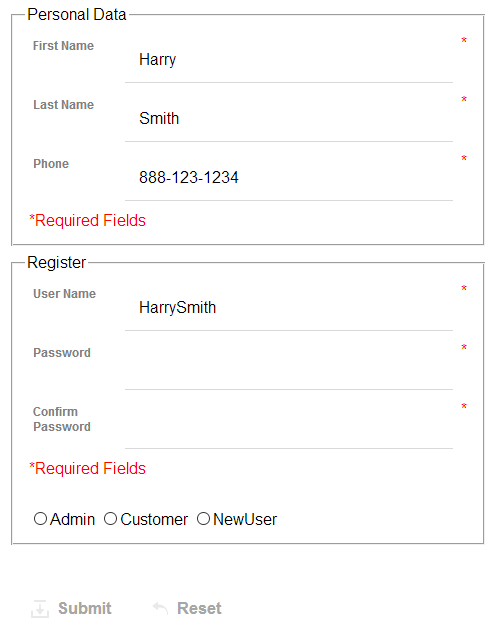
Open the Design tab and then return to 'Working Preview'. You should see that all of the fields that appear in the registered users table, for the user you defined, will be loaded into the component.
See Also